To improve the performance of your PC, it’s essential to detect and resolve hardware changes on Windows as soon as they occur. Keeping your Windows PC running smoothly requires regular updates and maintenance. One crucial aspect of this is ensuring your device’s drivers are up to date. You can update drivers manually or opt for an automatic update using third-party applications. However, there are times when Windows may have trouble detecting new hardware changes, which can lead to driver-related issues or hardware conflicts. In such cases, running a hardware scan is a simple yet effective solution. This article will guide you through the process of running a scan to detect hardware changes on your Windows PC.
How to Detect and Resolve Hardware Changes on Windows
Using Device Manager:
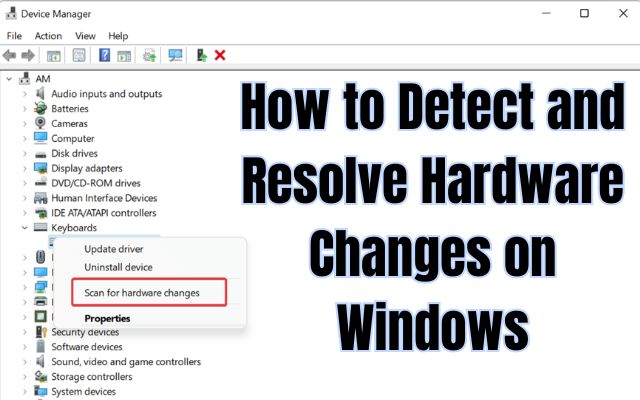
Device Manager is a built-in utility for managing peripherals on Windows PCs. It includes a “Scan for hardware changes” option that can help you identify and address hardware issues. Here’s how to use it:
- Access Device Manager: Press the Windows key and X simultaneously to open the Power User menu, which contains various shortcuts.
- Open Device Manager: Click on “Device Manager” to open the utility’s window.
- Select a device category: Choose a specific device category within the window.
- Run the scan: Click on the “Action” menu, then select “Scan for hardware changes.”
Alternatively, you can right-click on a device, and if it displays an exclamation mark indicating an issue, select “Scan for hardware changes” from the context menu. This step is especially helpful for resolving problems with problematic devices.
Using Computer Management Tool:
The Computer Management Tool incorporates Device Manager, making it another convenient option for running a hardware scan:
- Open Computer Management Tool: Access the Power User menu, select “Computer Management.”
- Access Device Manager: Click on “System Tools,” then select “Device Manager.”
- Select a device category: Choose the category relevant to your hardware.
- Initiate the scan: Click on “Action” and then select “Scan for hardware changes.”
Using Command Prompt:
For those who prefer using the Command Prompt, you can employ the “pnputil.exe” utility to scan for hardware changes. Follow these steps:
- Access Command Prompt: Type “Command Prompt” into the search bar or use the magnifying glass icon on the taskbar.
- Run as administrator: Right-click on “Command Prompt” in the search results and select “Run as administrator” to launch it with elevated privileges.
- Execute the command: Input the following command:
pnputil.exe /scan-devices - Scan for changes: Press Enter to initiate the scan.
You’ll see a “Scanning for device hardware changes” message, which should complete relatively quickly. Close the Command Prompt when you see the “Scan complete” message.
Creating a Desktop Shortcut:
If you prefer a more convenient way to scan for hardware changes, you can create a desktop shortcut using the “pnputil.exe” command:
- Create a shortcut: Right-click on an empty area of your desktop, select “New,” and then “Shortcut.”
- Enter the command: In the location box, enter or copy and paste this command:
C:\Windows\System32\cmd.exe /k pnputil.exe /scan-devices - Name the shortcut: Enter “Scan for hardware changes” in the shortcut name box.
- Adjust settings: Click “Finish” to complete the wizard, then right-click the shortcut, select “Properties,” and navigate to the “Shortcut” tab.
- Run as administrator: Under “Advanced,” check the “Run as administrator” option.
- Apply changes: Click “Apply” to set the shortcut to run with elevated privileges.
Now, you can conveniently scan for hardware changes with the desktop shortcut whenever needed. Double-clicking the shortcut will execute the “scan-devices” command.
Frequently Asked Questions (FAQ): Detecting Hardware Changes on Windows
1. Why do I need to detect hardware changes on Windows?
Detecting hardware changes is essential to ensure that your Windows PC runs smoothly. It helps identify and address issues related to drivers, peripherals, and hardware conflicts, which can impact your computer’s performance.
2. When should I run a hardware scan?
You should run a hardware scan when you encounter problems with newly connected devices, experience hardware-related issues, or need to ensure that Windows recognizes and manages hardware changes effectively.
3. What is Device Manager, and how does it help in detecting hardware changes?
Device Manager is a built-in Windows utility for managing hardware peripherals. It includes a “Scan for hardware changes” option that identifies and resolves issues with hardware detection and drivers.
4. How do I use Device Manager to scan for hardware changes?
To use Device Manager for scanning hardware changes:
- Press the Windows key and X to open the Power User menu.
- Select “Device Manager.”
- Choose a device category.
- Click on “Action” and select “Scan for hardware changes.”
You can also right-click on a problematic device and choose “Scan for hardware changes” from the context menu.
5. What is the Computer Management Tool, and how does it relate to Device Manager?
The Computer Management Tool incorporates Device Manager and provides an alternative method for scanning hardware changes. You can access it through the Power User menu, select “System Tools,” and then “Device Manager” to perform a scan.
6. How can I run a hardware scan using the Command Prompt?
To run a hardware scan from the Command Prompt:
- Type “Command Prompt” in the search bar and run it as an administrator.
- Input the command:
pnputil.exe /scan-devices - Press Enter to initiate the scan.
7. Can I create a desktop shortcut for hardware scans?
Yes, you can create a desktop shortcut to run hardware scans more conveniently. This allows you to execute the “scan-devices” command with a simple double-click. The article provides detailed steps on how to create this shortcut.
8. What issues can scanning for hardware changes help resolve?
Scanning for hardware changes can assist in resolving various hardware-related issues, such as detecting older hardware peripherals that Windows may not automatically recognize and reinstalling drivers for malfunctioning devices.
9. How often should I run a hardware scan?
The frequency of running hardware scans depends on your specific needs. It’s a good practice to perform a scan when you encounter hardware-related problems or when you add new devices to your PC.
10. Are there any third-party tools available for scanning hardware changes on Windows?
While the article primarily focuses on built-in Windows utilities, there are third-party applications available that can help with driver updates and hardware scans. However, it’s essential to use reputable software from trusted sources to avoid potential security risks.
- How to Fix Windows Signing You In With a Temporary Profile
- How to fix the “Emergency Calls Only” Error on Your Android Phone
Conclusion:
Running a hardware scan on your Windows PC is a simple but powerful troubleshooting method that can help identify and resolve hardware-related issues. Whether you use Device Manager, the Computer Management Tool, the Command Prompt, or a desktop shortcut, the process is straightforward and can be a valuable tool in maintaining the performance of your PC. So, keep your device drivers up to date and be ready to detect and resolve hardware changes when needed.